
Siding Installation
Installing Bevel, Log Cabin and One-Edge Siding
Horizontal Siding
Always start from the bottom and work your way to the top. It is critical that the bottom board is level before continuing the installation. Every few courses measure from the last course to the top of the wall in several places to be sure you are going up evenly. In general, all trim boards and corner boards should be installed prior to the siding. Use sixteen pennie (16d) siding nails.
Bevel and One-Edge Siding
Always nail just above the top edge of the board underneath so you don’t nail through both pieces. This allows the boards to shrink and expand as the seasons change without splitting the board. It is absolutely crucial that you hit the stud with the nail for it to hold.
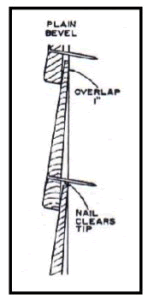
On bevel siding do not measure down from the top edge to set the next course but rather measure the exposure you want from the bottom of the last course. This allows for any variation in the width of the boards. For our 8″ bevel we recommend 6 1/2″ exposure, for 6″ bevel 5″ exposure and for 4″ 3 1/2″ exposure. Because one-edge siding is a true random you have to sort the entire batch into like sizes and run each course individually. Do not over-nail. Pound in the nail only until it is snug against the board. Over-nailing can cause splitting of the board on the back side.
Staining and Finishing Siding
Siding should be stained on the front and back before it is installed. If staining is done after installation, it should be done during the driest part of the year and after it has had at least 2 weeks to dry. Because siding shrinks and expands with fluctuating seasonal humidity, a white line can be left at the point of shrinkage.
If your siding is subject to intense sunlight with little or no shade, we suggest the application of a double coat of finish on the back of the boards. This will prevent the absorption of moisture from the back side of the boards, averting warping. This finishing is in addition to the application of house wrap.
Acclimation
RBM Lumber’s Siding material is acclimated and ready for installation.
General Note: RBM Lumber, Inc. is not responsible for shrinkage of lumber, splitting, or other issues caused by improper installation. If you have any questions about your particular application, please ask us. We are happy to help guide you.
Installing Log Cabin Siding
Start installing log cabin siding from the bottom and work your way to the top, using a level and/or string line. In general, 2×4, 2×6, and 2×8 trim boards should be installed prior to the log siding. Nail the siding 2/3 to 3/4 of the way down the board, one nail on each stud with sixteen pennie (16d) siding nails. Do not use more than one nail on one board through a stud, as this may cause splitting. Black siding nails, galvanized nails, steel siding nails, and 3” decking screws can all be used. Decking screws are recommended for installations that are south-facing or any area where the siding will be exposed to intense sunlight with little or no shade.
Staining Log Cabin Siding
Siding should be stained on the front and back before it is installed. If staining is done after installation, it should be done during the driest part of the year and after it has had at least 2 weeks to dry. Because siding shrinks and expands with fluctuating seasonal humidity, a white line can be left at the point of shrinkage. If your siding is subject to intense sunlight with little or no shade, we suggest the application of two coats of stain and of a coat of finish on the back of the boards. This will prevent the absorption of moisture from the back side of the log siding. This finishing is in addition to the application of house wrap.
Acclimation
RBM Lumber’s Log Cabin Siding is acclimated and ready for installation.
General Note: RBM Lumber, Inc. is not responsible for shrinkage of lumber, splitting, or other issues caused by improper installation. If you have any questions about your particular application, please ask us. We are happy to help guide you.
One edge Siding Installation
Installing One-edge Siding
When installing horizontal siding, always start from the bottom and work your way to the top. Every few courses measure from the last course to the top in several places to be sure you are staying parallel to the top and bottom. If adjustments are needed make several small ones rather than one big one. Channel Rustic siding is designed to be used vertically, as horizontal installation exposes the channel to weathering. In general, trim boards and corner boards should be installed prior to the siding.
Shiplap, Channel Rustic, and Drop (105) Siding
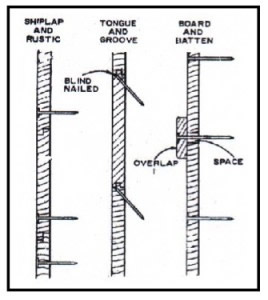
Shiplap products are face nailed one half to one inch in from or above the edge of the board underneath using twelve pennie (12d) or sixteen pennie (16d) siding nails. Nails on horizontal siding must hit the studs and on vertical they must hit the nailing blocks. Nails that only hit the sheathing have very little holding power. Galvanized or coated nails should be used for exterior applications to avoid weather streaking.
Tongue & Groove (T&G) Paneling
Interior 1⁄2 and Exterior 3⁄4 T&G Paneling should be nailed through the tongue (blind nailed).
Interior Tongue and Groove (T&G) Decking
T&G Decking should be nailed through the tongue (blind nailed) with sixteen pennie (16d) nails. Decking used for a floor must be blind nailed and face nailed or glued to prevent a squeaky floor.
Rough Board and Batten
Rough Board and Batten under boards should be spaced one half (1⁄2) inch apart and nailed with sixteen pennie (16d) siding nails or galvanized nails, one at the center of the board. The batten strip is nailed through the center with one twenty pennie (20d) box nail.
Staining and Finishing Siding and Paneling
Siding should be stained on the front and back before it is installed. Finishing the back side will help protect it from weather that invariably gets behind the siding. If staining and finishing is done after installation which we strongly discourage, it should be done during the driest part of the year and after it has had at least 2 weeks to dry. Because siding shrinks and expands with fluctuating seasonal humidity, a white line can be left at the point of shrinkage. If your siding is subject to intense sunlight with little or no shade especially on the south and west sides, we suggest the application of an extra coat of finish.
Acclimation
RBM Lumber’s siding materials are acclimated and ready for finish and installation.
General Note: RBM Lumber, Inc. is not responsible for shrinkage of lumber, splitting, or other issues caused by improper installation. If you have any questions about your particular application, please ask us. We are happy to help guide you.